r-anne-dom : a place for me (anne) to leave random blog posts.
Such as:
..knitting, sewing, and other random activities pursued
..Girl Guides of Canada : yep, Guiding Lives Here
..the 4 shops on Etsy : one features quality handmade items; the second has lots of patterns, & crafting supplies; the third is stocked with Vintage; and the fourth is guiding flowers.
Enjoy the r-anne-domness!

October 06, 2016

Tutorial - Busy Book - the Binder


Tutorial 

Busy Book - the Binder

This is how I would recommend this be done.

We used a paper-like binder that had some sort of laminated finish to it.

It was fairly small and thin, so it was what I wanted.


We removed the rings from the centre.


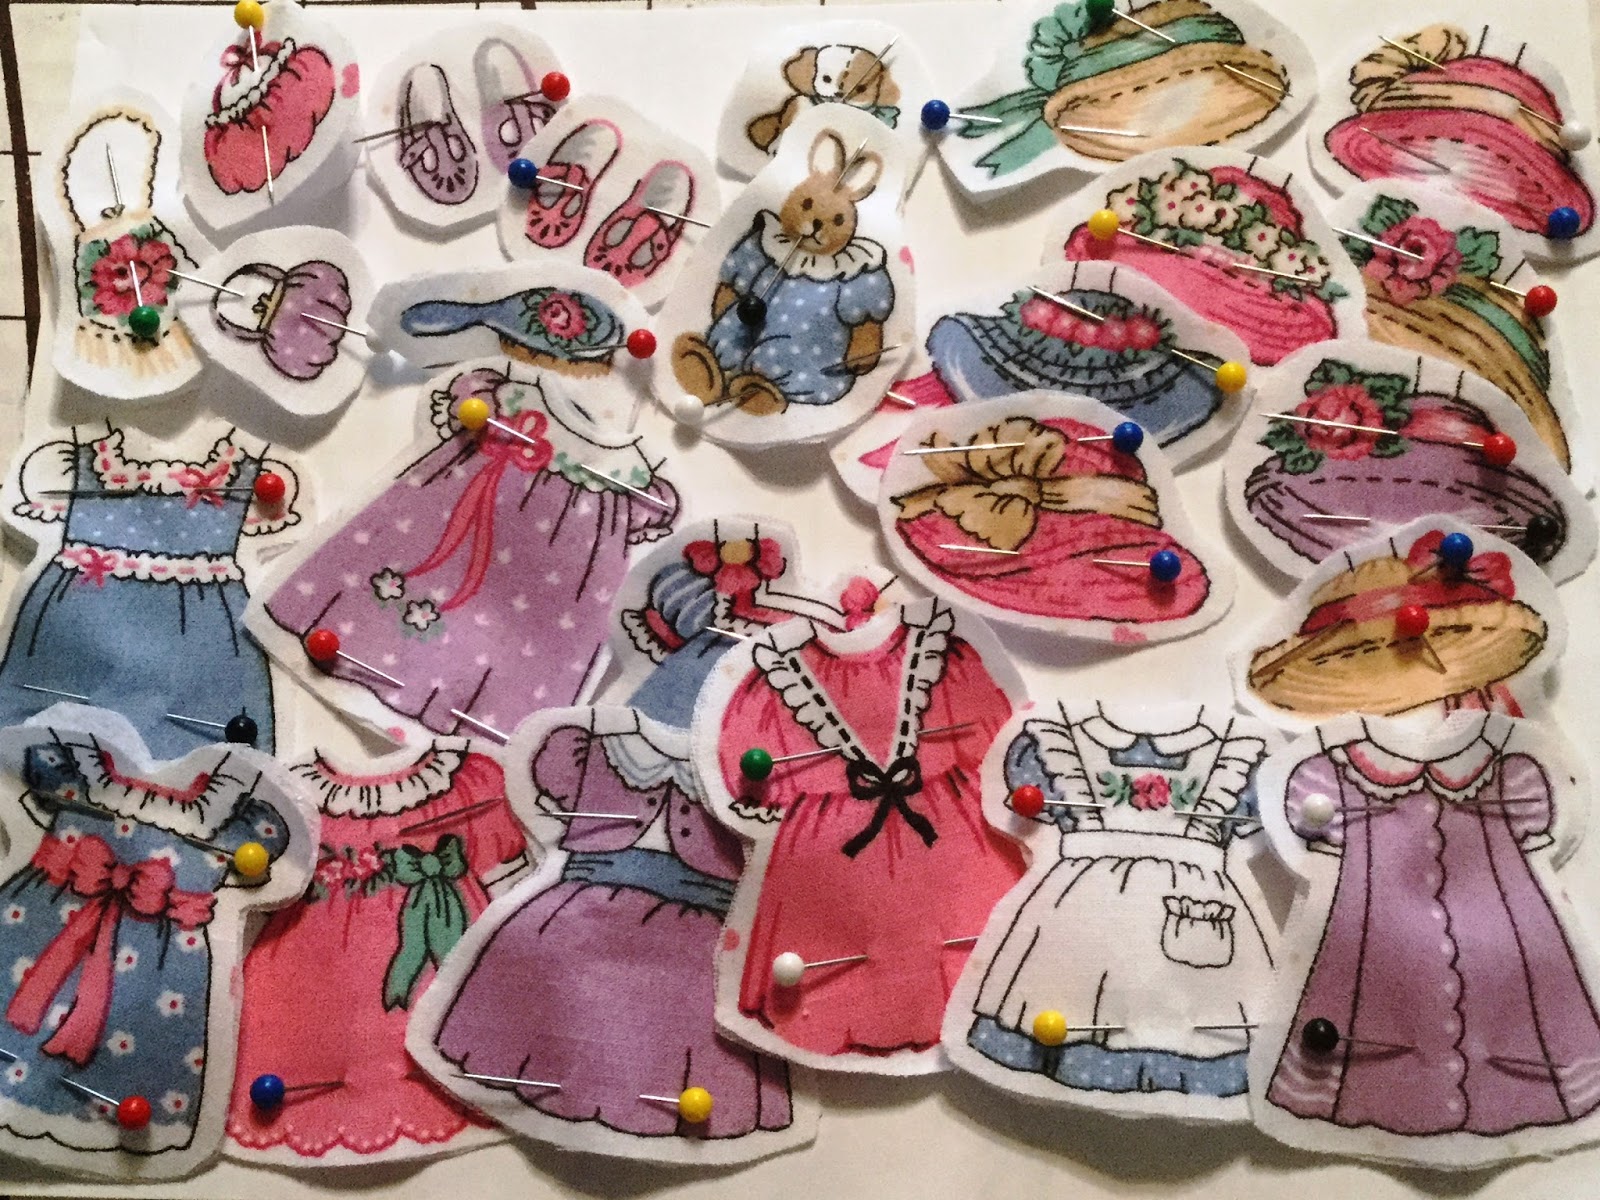
Below you can see the fabric pinned in place.


The white and blue pins in the centre mark where the spine is.
This is what inspired me to add the "braiding" feature.

Below is the book just before gluing it to the binder.


This is where my original plan fell apart.

I planned to use a spray adhesive.
On both sides of the binder.

What I did, didn't work so well.

So what I would recommend, is to mark where the centre is - where the book will fold down over the binder.
Mark it with pins first.
Then, turn it over, and on the inside, mark with chalk or similar - draw the line. 
This is where the top edge of the binder will go.

Then spray the binder, both sides.

Your hands will get sticky. 
The binder is sprayed.
You have to touch it to put it on the book.
Sorry.
Please leave a comment if you can do it without getting sticky!

Anyway ...
Put the binder in place on one half of the book.
Fold the book over the binder.
Try to smooth it as best you can.
The way I did it, this was next to impossible - I think this way might work better.

At this point, all your seams (3) will have raw edges.
Fold them under so all the raw edges will be inside.

On the one edge, I added a piece of bias tape for a loop to hold the book closed.

Then, if you can fold them but leave a bit of room, you can sew them with your machine.
I actually did this and it worked okay.
I don't know how to describe that, but play with it a bit and you'll see what I mean.

Or you can sew them by hand with a slip stitch.
Please leave a comment if you try this!
I'd like to know that someone had better luck than me with the spray adhesive part!

Finished book.

Can you see that I sewed the bottom seam with my machine?

The front cover - a little wrinkly.

October 04, 2016

Tutorial - Busy Book Inside Pages


Tutorial 

Busy Book Inside Pages

Here are more details on how I made the pages for Kaelyn's Busy Book.

Please note I jotted down measurements but they may not be the final size of the item in the book.
I made adjustments as I went along and forgot to mark down when I cut something to fit.

The floral fabric is the main cover for the binder and
it is approximately 24 inches x 25 inches so that when
it is folded, the size becomes 24 inches by 12.5 inches.

These photos generally show just half of the cover because it is folded over the binder.


Buckle:

I had a long thin scrap of fabric that I cut into 2 pieces, 
each was approximately 7 inches by 2 inches.

I sewed the buckle activity approximately 5 inches from the top of the binder.


Shoelaces:

The background for the shoelace activity was a scrap of fabric with sandals and flip flops on it!
It was approximately 12 inches by 6 inches in size. 
I turned under the edges and pinned it in place.

I made a small paper "pattern" for the 2 "shoe pieces" where the eyelets would be.
Those "shoe pieces" were approximately 4 inches by 3 inches with 2 rounded corners.


Ladybug "Sewing":

This was fun to try.
I saw something similar in another busy book so I wanted to see if I could do it.

I used a long scrap of pink fabric that was 20 inches by 3.5 inches.

I folded it in half so that all the raw edges would be hidden inside.

I measured and marked approximately where the 4 holes would be on one half.
Then I marked the 4 holes in the same spots on the other half.

I cut an X at each mark.
Then I folded back the X triangles and pressed them down.

Fold the long strip so all those X triangles are on the inside.
Stitch around all the squares.

Finally, I folded under the long and short remaining edges and sewed them closed too.


Here is what the left side looked like when completed:


Zipper Pouch:

The bottom part of the zipper pouch is lined.
The lining and outside fabric pieces are each approximately 11.5 inches by 6 inches.

I attached the zipper to the lining and the outside fabric.
I turned under the outside edges of each fabric so they'd be in between the 2 fabrics.

The top piece is approximately 11.5 inches by 3 inches.
I attached the zipper, folded it in half lengthwise and turned under all the edges.

I added a piece of seam binding to cover the opening at each end of the zipper to give it a bit more of a finished look.

NOW.

BEFORE you sew the pouch to the background, add the scrap flaps with button holes.
I just made these out of scrap fabrics.

I sewed the buttons on after the entire project was pretty much complete.

"Paper" Doll and "Clothes":

This was a cool fabric I'd picked up some time ago.
I knew it would be neat to add it to this project.

I used iron on stabilizer for each piece and left a small seam allowance when cutting out each piece.


I made sure to sew the velcro to the NON iron on side of the stabilizer FIRST.


THEN I ironed them.

And then I stitched around each piece.

You know, just because I've got lots of time. ☺


First I sewed the doll to the background.

Then I sewed velcro to the "doll" AFTER I sewed her to the floral background of the binder.

This way, the velcro would be more secure.

I added a piece of velcro just to the right, for the "toys" or purses, or whatever.
Another tiny piece of velcro near her shoes for the extra shoes.


Above shows the velcro.

Below shows the "doll" all dressed up.


The little pouch with the clear opening was a bit of a pain to make. 
I sewed some bias tape to the top first.
Then I added the half of the snap.
Then I took seam binding and put it both under AND over the square of plastic around 3 sides.
I sewed those sides down.
I made a flap similar to the button flaps, adding the other half of the snap.

Here is what the right side looked like when completed:


"Rapunzel" Braiding:

For this, I simply cut another "doll" head from the fabric and sewed it to the background.
I made 3 long strips of fabric out of scraps.
I covered the top end with a scrap of lace to hide the ends.
I tied knots in the bottom ends.

So that's it.
Other than gluing the entire thing onto the binder.

We'll cover that in another post.  
I'll link to it as soon as I do that.

Please leave a comment if you make a book - I'd love to see it!


Click Here for Busy Book - the Binder (Cover)

October 03, 2016

Tutorial - Busy Book for Kaelyn

Tutorial - Busy Book for Kaelyn

Wednesday evening my daughter texted me about Kaelyn.
She said Kaelyn could use some help with fine motor skills.
She and Kaelyn's mom were looking at busy books and similar toys.

I said "I can do that".


She requested pretty fabric.
I have that!
I knew I had this "paper doll" fabric and some coordinating prints.

And I knew I had pink!
And I knew I had other coordinating pretty fabrics.

So Thursday morning I started my sketching. 

Then I gathered all my bits and bobs and doo-dads to see what I might use.

By Thursday afternoon I was laying out the design. 

I spent Friday finishing up the design, cutting all the pieces and laying it all out.
Thank goodness for hubby - he removed the rings from the binder. ♥

That's when I realized I could add something to the spine!
So I added a piece to my sketching.

Now all fabric pieces were cut and ready to sew.

I even remembered to add some trims to the outside of the book!

Saturday was going to be sewing day.

I started about 10 a.m.
Just after 11 a.m. I was finished the sewing!

So then it was time to put the binder inside.
Suffice to say, there are good ways to do that, and not-so-good ways.
The tutorial for that step will outline the way I would recommend now that I'm finished.

Final details were completed on Sunday when I made all the "clothes" for the little "paper doll" on the right side of the book.
All the "clothes" fit inside the zipper pouch and/or the clear snap pouch.

I'll do a separate post to detail some of the parts of this project.
The binder - preparing it and inserting it. (link to come shortly)

I enjoyed doing this and am glad my daughter - and Kaelyn - gave me the opportunity.

Here are the final photos.

The front cover.

The inside.

Inside left.

Inside right.

The activities we decided on were ...

On the right side of the book:
Velcro (doll and clothes), Snap (pouch), Zipper (pouch), and Buttons


The centre spine of the book has "Rapunzel" and her fabric braids.


The left side of the book has the Buckle, Shoelace Tying, Beads (counting, dexterity), and the LadyBug ("sew" ladybug button through the holes and put through buttonhole at the end)


No, I don't think I'll ever make another one. 
It was just something I enjoyed doing this one time.